Imagine you’re all set with your popcorn and snacks, ready to enjoy a comedy movie on your iPhone using the VLC media player. But as you open the app and tap on the movie, you find out that the app isn’t working properly. You’re having trouble playing the video, or there’s no sound in the video. It’s frustrating and your mood changes in just a few seconds. You were excited to watch a comedy, but now it’s a letdown.
If you’re in this scenario and looking to fix the VLC media player, you’re in the right place. Here we’ll discuss different practical fixes to get you out of this situation. We’ll also mention possible reasons why the VLC app might not be working or why there’s no sound in the video on your iPhone. Let’s get started without any delay.
What Are The Reasons VLC App Not Working on iPhone?
Having trouble with VLC on your iPhone is unusual. But It’s important to know why these issues happen to find out the best solutions. Understanding what might be making VLC not work properly helps us figure out the problem and find the best ways to fix it.
So, without any delay, let’s explore the four likely reasons behind VLC not working on your iPhone.
1. Outdated App Version or, iOS Compatibility Issues: If you’re using an outdated version of the VLC app, it may not be compatible with the latest iOS updates of your iPhone. That’s why VLC may not working properly.
2. Bug in the App: Like any software, VLC may have occasional bugs or glitches. Keeping the app updated can resolve many of these issues.
3. Insufficient Storage Space: When your iPhone is running low on storage, VLC may encounter performance issues. This is because the app needs space to store temporary files and buffer data.
4. Video File Corruption: If the video files you are trying to play with VLC are corrupted or damaged, it can lead to issues with the app.
Ways to Fix VLC Not Working on iPhone
Now, let’s check out different tried and tested fixes to get VLC working again. Consider each fix seriously, and since you know the potential reason, finding the best fix from the list should be straightforward for you.
1. Force Quit VLC App
Force quitting the VLC app can often resolve issues whether it’s not working properly on your iPhone. This simple fix is particularly useful when the app freezes or lags due to high storage usage or heavy device activity. Force quitting the app allows it to restart fresh.
iPhones With Home Button:
1. Press the Home button twice, which will bring up the app switcher.
2. Locate the VLC app in the app switcher.
3. Swipe up on the VLC app’s preview to force quit it.
4. Open the VLC app again from the home screen.
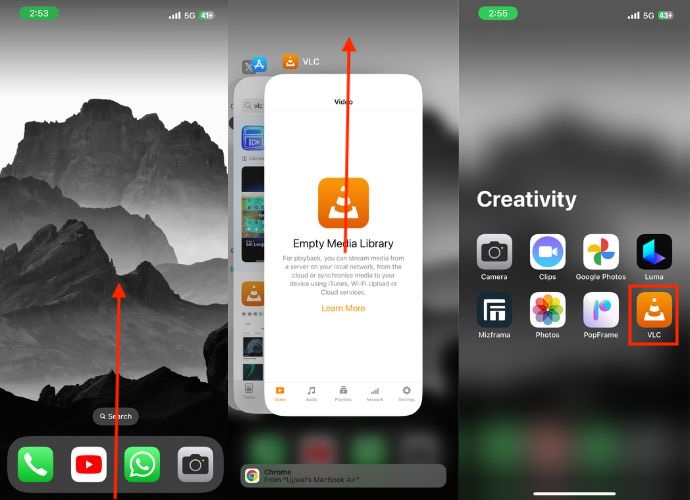
iPhones Without Home Button:
1. Swipe up from the bottom edge of the screen and pause in the middle to access the app switcher.
2. Locate the VLC app among the apps.
3. Swipe up on the VLC app to force quit it.
4. Allow a moment for the app to close completely.
5. Reopen the VLC app by tapping on its icon from the App Library.
2. Unmute the Video
If the video you are trying to play has no sound, it might make you think VLC is broken. it could be because the video is silent or the volume setting in the app needs fixing. This simple mistake can be puzzling, especially if you don’t know about the sound settings in the VLC app. Turning the sound on and making sure the volume is set properly can quickly solve the issue.
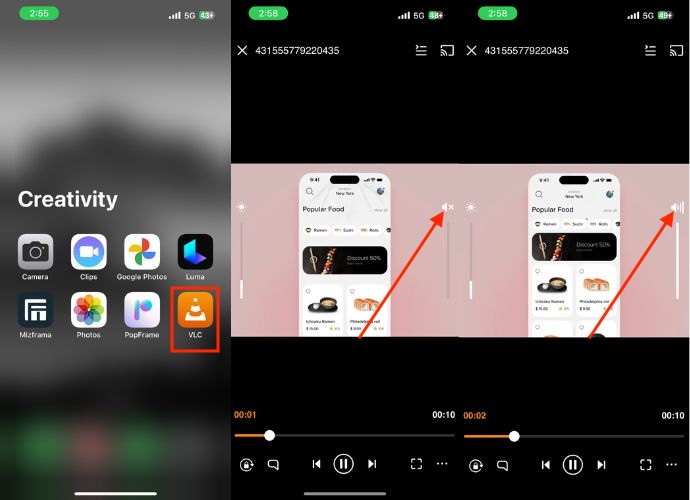
1. Open the VLC app on your iPhone.
2. Play the video that is experiencing playback issues.
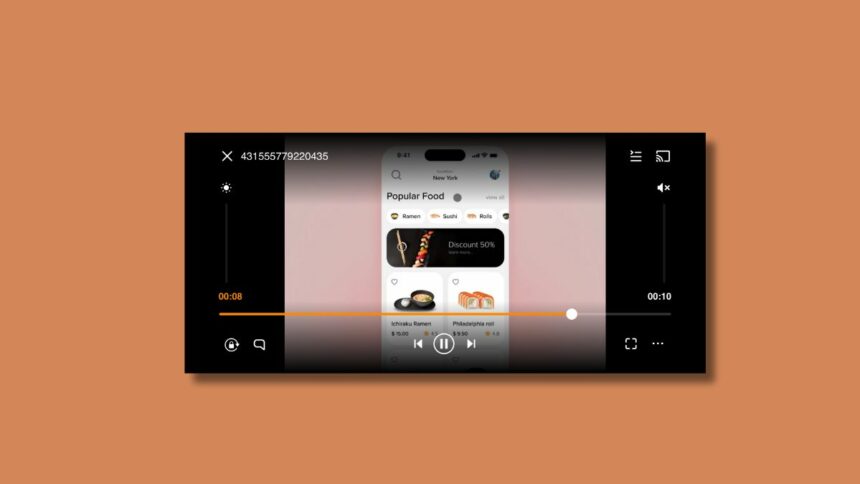
3. During playback, check for the speaker icon on the screen. If it has an “X” on it, the video is muted.
4. Tap the speaker icon to unmute the video.
5. Adjust the in-app volume using the volume controls on the screen or the physical volume buttons on your device.
6. After that, restart the video to see if the issue is resolved.
3. The Video File is Corrupted
If you’re experiencing a problem while playing video in VLC, the culprit may be a corrupted video file not supported by VLC. Broken video files or those made with unsupported codes might not work well in VLC, causing the videos to not play. VLC needs compatible codes to understand and play the video.
There might be an issue with the video alone. To investigate, make sure to check if the video doesn’t play in another media player or on a different device. If the video doesn’t play in these scenarios, the problem is likely with the video file itself. To resolve this, consider obtaining an undamaged version of the video file from a different source.
4. Select Another Audio Track
Choosing a different audio track, if available, or deselecting and reselecting the existing track can resolve issues related to audio playback. This fix aims to provide an alternative track or refresh the current one, potentially restoring sound. Issues with the currently selected audio track, or its compatibility with VLC, may result in a lack of sound.
By selecting another track or reactivating the existing one, you are attempting to address potential track-related problems.
1. Open the VLC player and play the video.
2. Tap the audio & subtitles button appearing on the bottom left corner.
3. If multiple audio tracks are available, select an alternative track.
4. If the video has only one track, choose to Disable it.
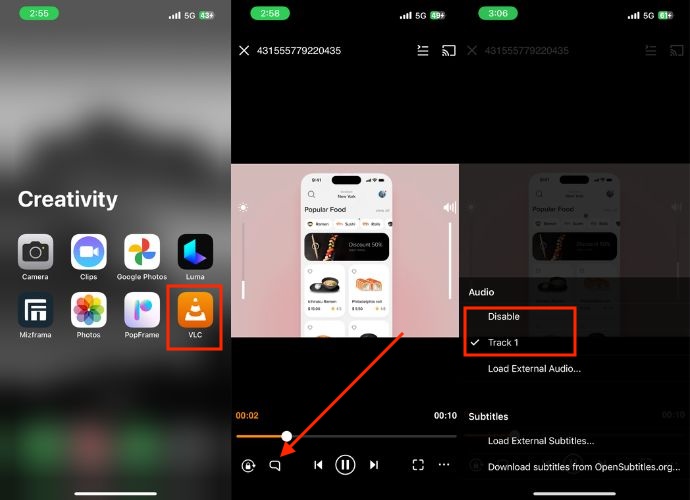
5. Force quit the VLC app using the method we have discussed, reopen the app, and replay the video.
6. If the issue persists, tap the audio & subtitles button again.
7. Under the Audio heading, select Track 1.
5. Set Playback Speed to 1.00x
Altering the playback speed of a video can sometimes affect its sound. By setting the playback speed to the default (1.00x), you ensure that the video plays at its normal speed, preventing any potential audio disruptions.
Playing a video at an unusual speed, either too slow or too fast, can result in audio issues. Resetting the playback speed to 1.00x aims to eliminate any unintended muting or distortion of the audio. Here’s how you can do so:
1. Open the VLC player and play the video.
2. Tap the three dots icon on the VLC player screen.
3. Select Playback speed from the menu and drag the Playback speed slider precisely to 1.00x.
4. If you’ve made previous adjustments, tap Reset to bring all changes back to the default setting.
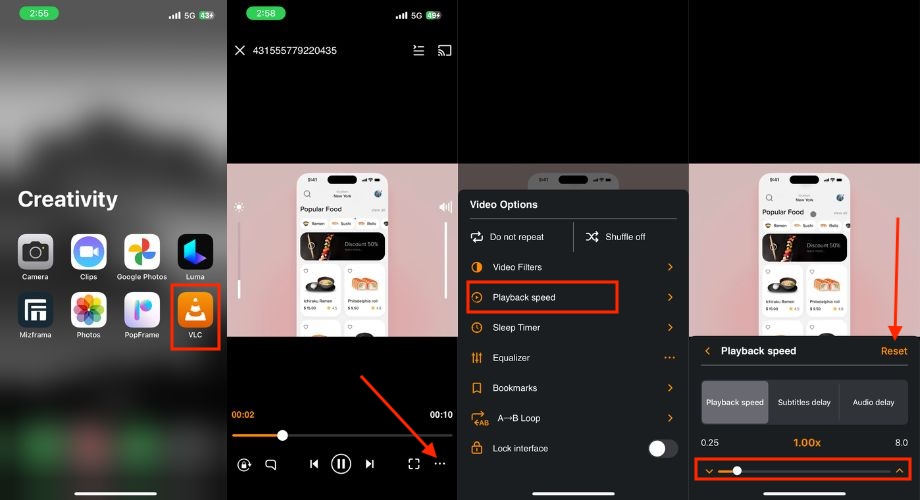
5. Exit the settings and replay the video to check if the sound issue has been resolved
6. Restart your iPhone
When did you last restart your iPhone? Many readers haven’t done it in a while but Restarting your iPhone is an effective method to resolve various issues, including problems with VLC. And it’s always worth restarting your iPhone regularly. It can help the iPhone to refresh the system and help to clear any temporary glitches that may be affecting VLC App performance.
Restart iPhone 8 and Later Models:
1. Begin by simultaneously pressing and holding the Power button along with either the Volume Up or Volume Down button until the Power menu prompts.
2. On the Power menu screen, swipe the slide to power off to shut down the iPhone.
3. Allow a wait of at least 30 seconds before proceeding to the next step.
4. Now, press and hold the Power button for a couple of seconds to start the iPhone again.
Restart iPhone 7 and Earlier Models
1. Press and hold the volume down button and the power button simultaneously.
2. Continue holding it until the Apple logo appears on your iPhone screen.
3. Allow some time, and your iPhone will undergo a restart.
Note
To avoid any glitches and issues in the future with any applications, restart your iPhone at least once per week.
7. Check your iPhone’s Audio Output
If you’re encountering difficulties with the VLC app on your iPhone, particularly regarding sound playback, Before getting into serious fixes, it’s essential to check your iPhone’s audio output. By confirming the audio output settings, you can rule out potential issues.
Your iPhone may be connected to a Bluetooth device without your knowledge, confusing when attempting to play audio or video through VLC. By confirming the status of any connected Bluetooth devices and reviewing your iPhone’s audio output settings, you can effectively troubleshoot and resolve potential issues before exploring more fixes.
1. Slide down from the upper right corner of your iPhone screen to open the Control Center.
2. Look for the Bluetooth icon. If it’s lit up, it indicates that Bluetooth is enabled.
3. Tap and hold the Bluetooth icon to see if any devices are connected. If connected, it will display the connected device’s name.
4. Consider disconnecting it temporarily to check if it resolves the sound issue in VLC.
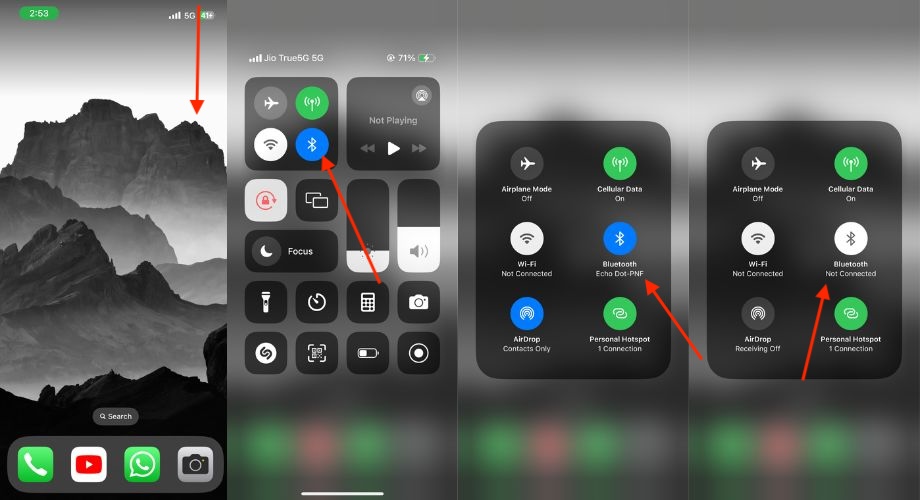
If there are no connected Bluetooth devices or disconnecting them doesn’t resolve the issue, ensure that the iPhone’s audio output settings are correct. If the issue persists even after verifying the audio output settings, you can proceed to explore further fixes.
8. Update VLC
If your iPhone’s VLC app is not working properly, it may be due to problems within the app. To fix this, try updating the VLC app from the App Store. If this issue is being faced by many users and has become widespread, the VLC developers must have released an update with improvements, bug fixes, and new features.
To update the VLC app on your iPhone follow the below steps.
1. Open the App Store on your iPhone.
2. Click on the profile icon appearing in the top right corner.
3. Scroll down and check for the VLC app in the available updates list.
4. If you find the VLC app, tap on the update icon appearing next to it.
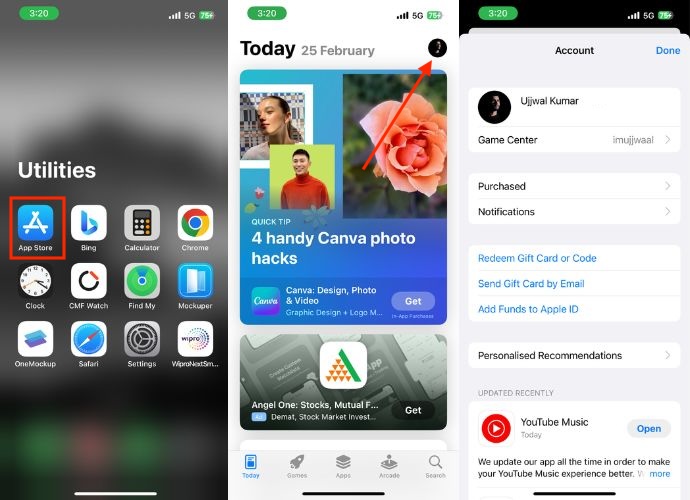
5. Alternatively, you can also search for the VLC app through the App Store search box and update it.

5. After updating VLC, reopen it and verify if it is working or not.
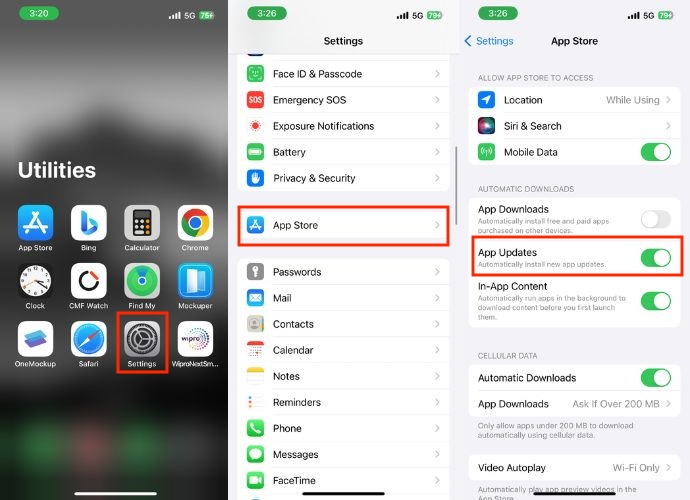
6. To prevent future issues, be sure to enable automatic app updates on iPhone and routinely inspect for app updates. For that, open Settings on your iPhone, scroll down, and tap App Store. After that, under Automatic Downloads, enable the toggle right to App Updates.
9. Redownload the Video or Transfer it Again
If you’re experiencing issues with a specific video file in the VLC app, redownloading it or transferring it again can sometimes resolve playback problems. This fix involves deleting the existing video file and obtaining a fresh copy, ensuring that any potential issues with the original download or transfer are addressed.
Issues with the video file itself, such as corruption or incomplete downloads, can lead to playback issues in VLC. Redownloading the video or transferring it again ensures that you have a clean, complete copy of the file, potentially resolving any underlying problems.
1. Open the VLC app or navigate to the folder on your device where the video is stored.
2. Locate the problematic video file and delete it.
3. Consider the following points when redownloading or transferring the video:
- Use a different downloader app or website than the one you used previously.
- Try downloading the video in a different resolution, format, or file size.
- Use a different original source if available. For example, if you downloaded the video from website A initially, try obtaining it from website B.
- Ensure that the video is fully downloaded without pausing the download midway if possible.
4. Once the video has been redownloaded or transferred again, verify that the new copy is complete and without any issues.
5. Open the VLC app and attempt to play the newly downloaded or transferred video.
6. Check if the playback issue has been resolved.
10. Offload the VLC App
You can try fixing the VLC app by offloading it. Offloading is like deleting the app, but it keeps your app data safe. This process can help you resolve issues with the app, free up storage space, and refresh the app by clearing its cache.
Here’s how to offload the VLC app on your iPhone:
1. Once the Settings app is open, scroll down a little and tap on General Settings.
2. Select iPhone Storage and scroll down to find the VLC app in the list of apps.
3. Tap on it once you find it.
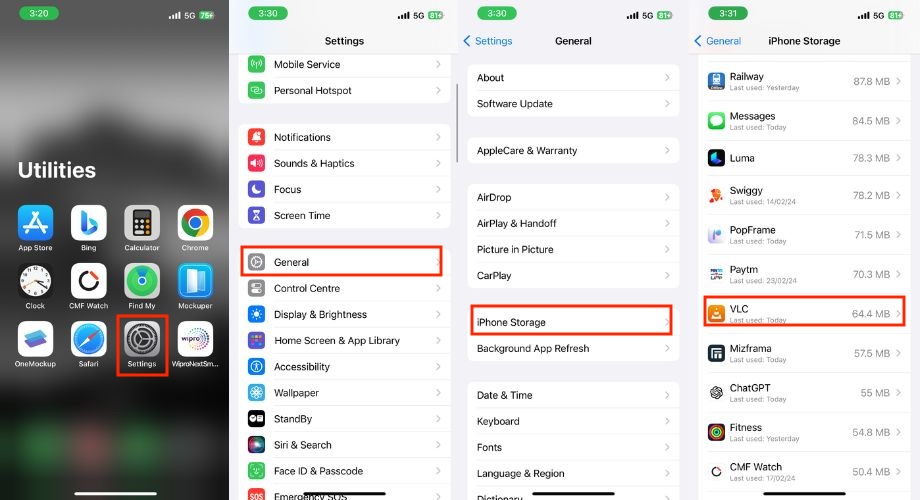
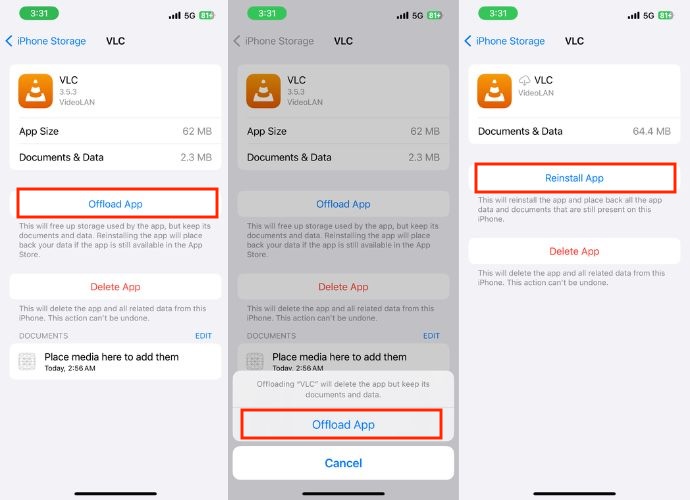
4. After that, hit the Offload App option.
5. A small popup will appear below; tap Offload App again.
6. Now, click on Reinstall App to install the VLC app again.
11. Delete and Reinstall the VLC Media Player
Have tried all the fixes above but still cannot able to get a perfect one. But if you figured out that the problem is with the VLC app then you should delete the app and install it again. Maybe there’s something in the app itself that will be fixed with a fresh reinstallation only.
Follow the steps below to uninstall and reinstall the app.
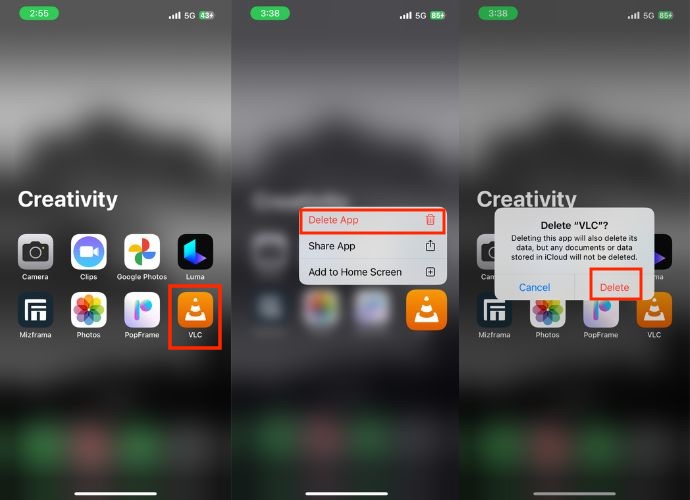
1. Unlock your iPhone and go to App Library.
2. Locate the VLC app and tap and hold its icon until it shows a small popup menu.
3. Select the Delete App option from the menu.
4. Confirm the deletion process by tapping Delete when prompted.
5. Open the App Store on your iPhone, tap the search bar, and search for VLC.
6. Once you find the VLC app in the search results, tap on it.
7. Now, tap the download icon (cloud with an arrow) to reinstall the app.
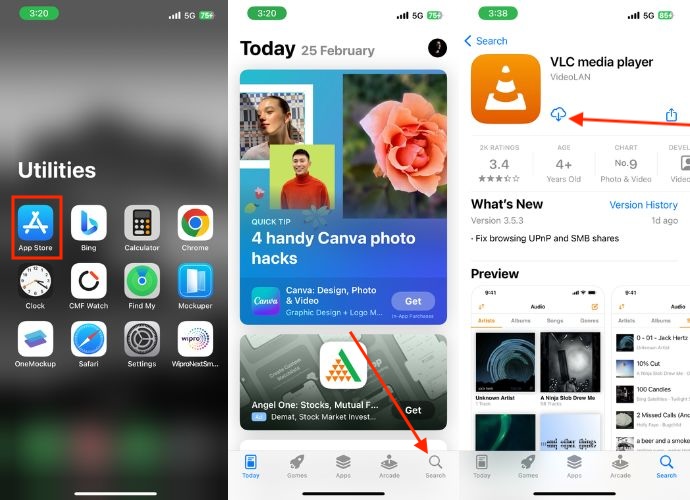
8. Wait for the VLC app to download and install on your iPhone. The installation process may take a few moments depending on your Internet connection.
9. Open the VLC app once the installation is complete.
10. Test the app’s functionality, including audio playback, to see if the issue is resolved.
12. Reset All Settings
It’s possible that changes you’ve made to your iPhone’s system settings could be causing issues with the VLC app. If this is the case, you can Reset All Settings to restore everything to the default settings, which might help the VLC app start working again. This won’t delete any of your data, but it will reset any custom settings you’ve made.
Here’s how to do it:
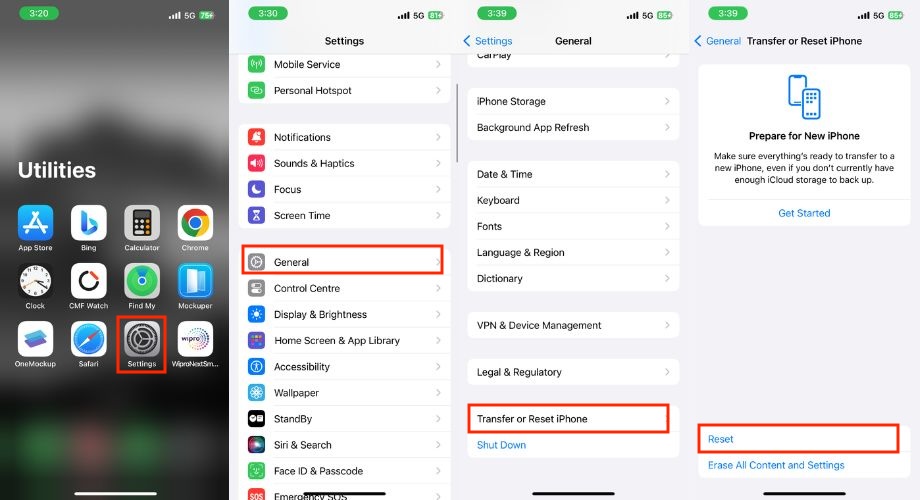
1. Open Settings on your iPhone.
2. Tap on the General option.
3. Scroll down, tap on Transfer or Reset iPhone, and then tap on the Reset button.
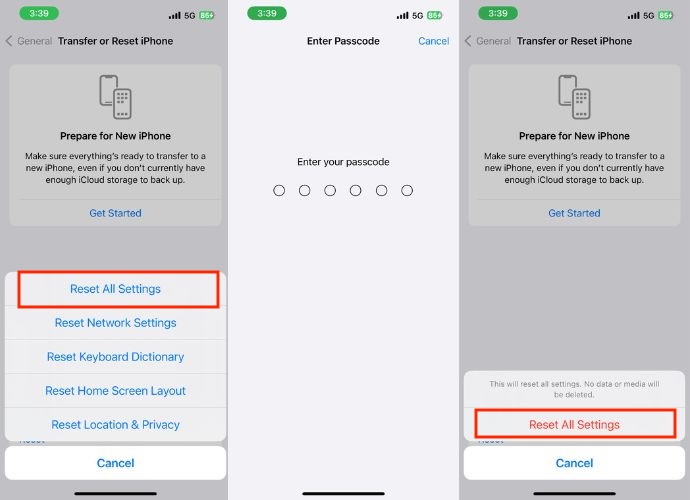
4. Tap the Reset All Settings option and enter your iPhone’s passcode on the new screen.
5. Confirm the reset by tapping Reset All Settings again.
13. Reset your iPhone
If you’ve tried all the fixes mentioned above thoroughly, following each step carefully, and you’re still having trouble with the VLC app not working, then you can try, as a last-ditch effort, to resolve the issue by resetting your iPhone. This isn’t the best solution for an app issue, but if you’re particularly fond of the VLC app and want to continue using it, then resetting your iPhone might help.
Resetting your iPhone will erase all data, photos, and videos from your device. If you have a proper backup, then proceed with these steps. Or else, you have to create a backup for your iPhone.
After that, you can follow these steps:
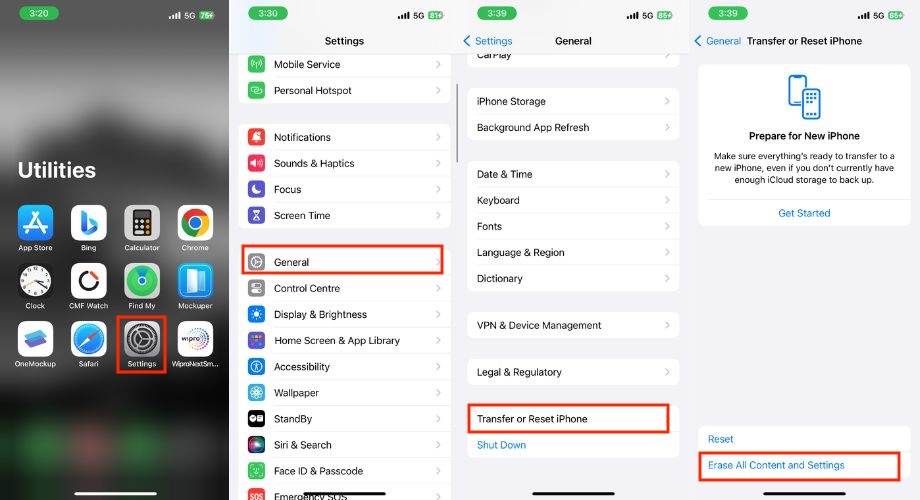
1. Open Settings, scroll down a little bit and tap on the General option.
2. Now, tap on Transfer or Reset iPhone, and then tap on Erase All Content and Settings.
3. You’ll be redirected to another window with your apps, data, and other information. Tap Continue to proceed.
4. A confirmation pop-up will appear. Tap Erase iPhone, then enter your passcode or Apple ID passcode, or both if needed.

5. The reset process of your iPhone will start soon. It will take some time, and after a while, your iPhone will be reset to its factory settings.
Conclusion
By following the above-mentioned methods, your VLC app should be functioning smoothly by now. Also, the above methods will also fix the issues if you are having any with your iPad. However, if you are looking to fix VLC issues on macOS, then you can check out our guide on how to fix VLC Media Player not working on Mac.
I hope you found this helpful. If this resolves the issue, please feel free to share it with your friends. However, if you have any doubts or suggestions, do let us know in the comment box. We are always here to assist you.