One of the great features of VLC Media Player; is the ability to add or enable subtitles to videos. While watching a movie, a series, or some other video in VLC Media Player, we tend to turn subtitles on. Subtitles can be a helpful tool; for those who are hard of hearing or want to watch foreign language movies with translations to understand the story.
Some movies come with embedded subtitle files, while others require downloading subtitles from an external source. You can use the built-in tool or search for subtitles on the web; to download subtitles. In this tutorial, we will go through the step-by-step process of manually adding and enabling subtitles to your videos in VLC Media Player.
Subtitle Formats Supported by VLC Media Player
If you have a question – “What caption formats can I open in VLC Player?” Let me tell you that, in VLC Media Player, you can use several different caption formats. Subtitle files are generally in .srt format. However, there exist other subtitle formats too.
Here is the complete list of supported formats:
- SubRip (.srt)
- MicroDVD (.sub)
- SubViewer (.sub)
- SSA1-5 (.ssa, .ass)
- JACOsub (.jss)
- MPsub (.sub)
- Teletext
- SAMI (.SAMI)
- VPlayer (.txt)
- Vorbis comment (.ogg)
- Closed captions
- VobSub (.sub, .idx)
- Universal Subtitle Format (.usf)
- SVCD / CVD
- DVB
- OGM (.ogm)
- CMML
- Kate
- ID3 tags
- APEv2
Turn On Encoded Subtitles in VLC
Sometimes some video files come with embedded subtitle files. If the video files have subtitles embedded within the video, you don’t need to download and load the external subtitles in VLC.
You can follow the steps mentioned below to enable it.
1. Open VLC Media Player and play the video file.
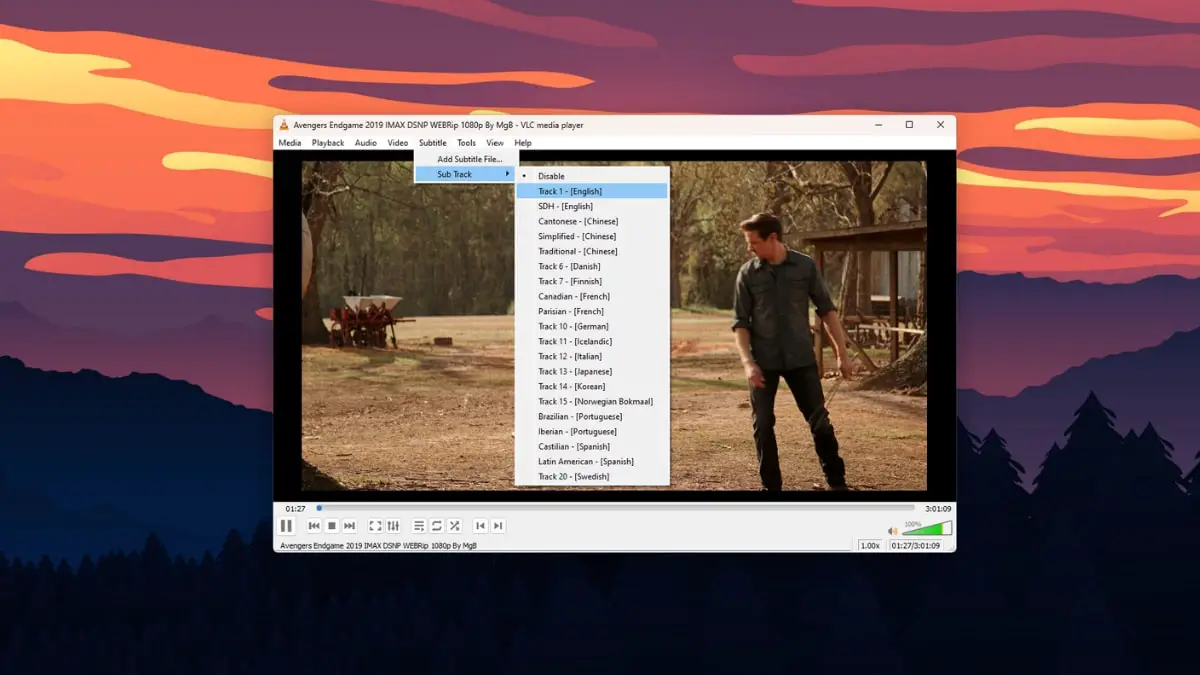
2. To check whether the video file has embedded subtitles files. Click the Subtitle tab in the top menu and select the Sub Track option. If you get the subtitle list, select the preferred subtitle file.
Note
You can also access the subtitle menu by right-clicking on the screen and selecting Subtitle from the context menu.

3. After that, you will get the subtitle in the video area. You can also change the position of the subtitle in VLC Media Player.

Now, you can use the below method if the video file doesn’t include any embedded subtitles files.
Manually Add Subtitles in the VLC Media Player
If the subtitle is not embedded within the VLC, let’s discuss; how to manually add a subtitle to the VLC. For that, you have to download the subtitle file from the internet. A popular site to get subtitles from is OpenSubtitles, but there are other sources too.
Once you’ve downloaded the subtitle file, follow these steps:
1. Open the video in VLC and make sure it begins playing. You can use Ctrl + O to open the file.
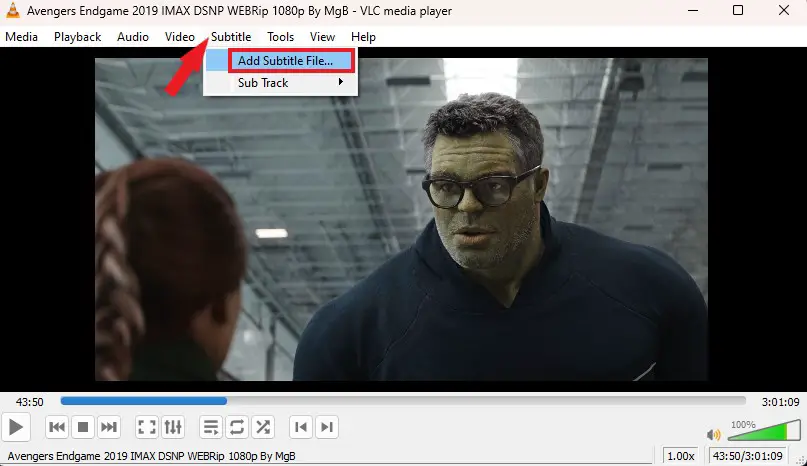
2. From the top menu bar, click the Subtitle tab and select the Add Subtitle File… option.

3. Browse to the location where your subtitle file is present and hit the Open button.

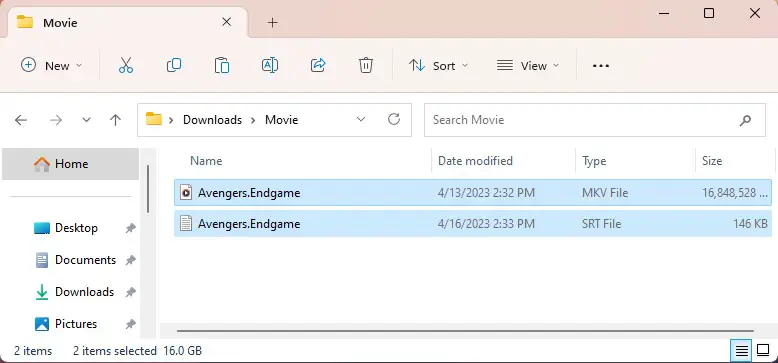
4. Alternatively, if you want to load the subtitle automatically from the beginning when the video is playing. You can put your movie file and subtitle file in the same folder. Give both those files the same file name. Only the file extension will be different.
Here is an example:
Movie file name => Avengers.Endgame.mp4
Subtitle file name => Avengers.Endgame.srt

Note
For multiple subtitles for more than one language, use the format movie.name.lang.srt (example: Avengers.Endgame.en.srt or Avengers.Endgame.ru.srt)
Conclusion
That’s it; this is how you can add subtitles in VLC Media Player. If you are having synchronization issues with subtitles and audio, you can check our linked guide on; how to sync subtitles in VLC Media Player. Also, you can check our guide to download subtitles automatically with VLC.


